I’m sure we can all agree, adopting a cloud strategy is awesome. The opportunities and benefits it affords are many. However cloud governance is an ongoing problem that plagues security, compliance, and management teams, which cloud vendors like Oracle are continually trying to solve.
If you’re reading this, you’ve probably been asked, or heard at least once:
Who has access to what in our environment?
Any Security / Compliance Manager
The answer should be easy and simple. However the reality is likely lots of manual time & work, spreadsheets, and endless clicking in a cloud console. If you’re doing this manually then I agree, it’s time that you could be dedicating to more important tasks.
The challenge in trying to answer these questions:
- What users exist and what groups do they belong to?
- What does my OCI tenancy compartment structure look like?
- What policies have users explicitly created?
- What permissions do users have in my tenancy?
- Are there any excessive / non-compliant policies & permissions in my tenancy?
is that these complex relationships can’t be easily represented and interpreted in a table-like format. In the OCI ecosystem:
- users can be federated with an Identity Provider and can belong to one or many federated, or local IAM groups,
- policies can be defined for “any-user” or for a group,
- policies are inherited meaning they apply to all sub-compartments from which the policies are applied.
To make things easier I’ve created a solution using Oracle tools and services to simplify the auditing of OCI tenancies and user permissions called “Peek”.
Peek comprises of a Docker container with MySQL, the OCI-CLI & a Ruby script and uses an Oracle APEX Instance to view the data and visualise these complex relationships. Here’s a short video that demonstrates and explains Peek in action:
Running Peek yourself, is easy, and can be set up in as little as 20 minutes. However before we begin there are a few pre-requisites which you’ll need:
- A Docker environment to run the Peek container,
- A running, and admin access to an Oracle APEX instance,
- An OCI-CLI config file, and valid OCI API key for a user with read permissions in your tenancy,
- And optionally, an Oracle Identity Cloud Service / IAM Identity Domains instance.
Installing Peek into Oracle APEX
First we’ll install and configure the Peek application into your APEX instance. If you don’t have an existing APEX instance, you can create one via the OCI Console.
- Create an APEX instance with default settings E.g. Database Version 19c, 1 OCPU, 1TB Storage, or settings that you wish to use.
- Log in to your APEX instance with the ADMIN user password you specified during creation.
- Click “Create Workspace” and enter
- Database User: PEEK
- Password: <a strong password>
- Workspace Name: PEEK
- Click “Sign in to PEEK”, which is shown in the green alert box at the top of the page.
- Enter your user credentials created during Step 3.
- Download the Peek application ZIP file from Github https://github.com/scotti-fletcher/peek-apex/blob/main/peek-apex-1.0.zip
- Select “Import” from the App Builder drop down menu.
- Select the downloaded file, ensure File Type “Database Application, Page or Component Export” is selected and click Next.
- The File Import Confirmation will display, click Next.
- The Install Database Application will be displayed, you can accept all default values. Click “Install Application”.
- The Install Application confirmation will display, click Next.
- Click Install.
- Click “Edit Application”.
- Select “SQL Scripts” from the SQL Workshop drop down menu.
- Download the Peek application database script from Github https://github.com/scotti-fletcher/peek-apex/blob/main/peek-apex-db.sql
- Edit the SQL file and update the values of p_email_address and p_web_password to those you’d like to use. It’s highly recommended you choose a new, unique, strong password.
- Click Upload, Select the file you downloaded in Step 15 and edited in Step 16, enter “Install” into Script Name, and click Upload.
- Click the Run button on the uploaded script.
- Click “Run Now”.
- Click “Manage Users and Groups” from the top right menu.
- Click the API user.
- Click “Group Assignments”
- Select all “oracle.dbtools.role.autorest.*” groups from the left list box and add them to the right list box.
- Click “Apply Changes”
- To confirm your APEX ORDS RESTful services are configured correctly you can run:
curl -i -k --user API:<password from Step 16> https://<your apex hostname>/ords/peek/grant/
and you should receive a HTTP 200 response with a JSON body.
If You Have an Oracle Identity Domain Cloud Service
This part is optional. However if you are using IDCS, to map and visualise the IDCS / IAM Group relationships we must configure IDCS to allow our Docker container to retrieve the information from the IDCS API.
Note: Oracle Identity Cloud Service is in the process of becoming OCI IAM Identity Domains. I will update this guide to include Identity Domain specific instructions in the near future.
- Log in to your Oracle Identity Cloud Service console.
- Select Applications from the left-hand menu.
- Click “Add”, and select “Confidential Application” to create a new Application.
- Name the Application “Peek”, optionally provide a description and click “Next”.
- Select “Configure this application as a client now” and check the “Resource Owner” checkbox.
- Scroll down to “Grant the client access to Identity Cloud Service Admin APIs” and click Add.
- Select “Audit Administrator” and click Add.
- Scroll up and click Next.
- On the “Expose API’s to Other Applications” page leave “Skip for later” selected and click Next.
- On the “Web Tier Policy” page leave “Skip for later” selected and click Next.
- Click Finish, Your Client ID and Client Secret will be displayed. Note these down in a text file for later and click Close.
- Click “Activate”. This is important otherwise your API calls will fail.
Gathering Required Input Values
Before we run the Docker container we first need to gather a few additional details which are required by the Ruby script running in the docker container, specifically:
- Your OCI Tenancy OCID.
- The OCI IAM URL.
- The URL for your APEX Instance.
- The credentials you created for the APEX API user.
- The full path to your local directory where your OCI config and .pem key exists.
And, if you have an IDCS Instance:
- The previously created IDCS Client ID.
- The previously created IDCS Secret.
- The URL of your IDCS instance.
- The OCID of your IDP integration.
Below are instructions on how to obtain these values. I suggest noting them values down in a text file as we will be passing these values as environment variables to our Docker container.
To find your OCI Tenancy OCID
In the OCI Console, navigate to “Identity & Security” and click Compartments. Your Tenancy OCID should be the first line, hover over the OCID and click Copy
In your text editor add a line:
OCI_TENANCY_OCID = <value from clipboard>
To find your IAM URL
Your IAM URL will be https://identity.<oci-region>.oraclecloud.com. You will need to replace “<oci-region>” with one of the regions you are subscribed. As an example my URL looks like https://identity.ap-sydney-1.oraclecloud.com
After making the substitution, add the line to your text editor:
OCI_IAM_URL = https://identity.<oci-region>.oraclecloud.com
To find your APEX URL
Click “Launch Apex” from the OCI console, and copy the Hostname from your web browser address bar. As an example the URL looks like https://yj6g7sq14zvoj-peek.adb.ap-sydney-1.oraclecloudapps.com. Note that there should be no trailing forward slash at the end.
Add this line to your text file:
APEX_URL = <Your APEX URL>
To find your OCI config Directory
The OCI CLI config typically lives in ~/.oci/. The config file must contain a DEFAULT profile which will be used by the Docker container. The ~/.oci/ directory must also contain the .pem key. If you have multiple profiles in your ~/.oci/config file you may wish to create a separate directory with just the config and .pem key just for this activity. As an example my ~/.oci/ directory looks like:
scott@scott-mac ~ % ls -alh /Users/scott/.oci

drwxr-xr-x   6 scott  staff   192B 15 Jun 14:59 .

drwxr-x---+ 58 scott  staff   1.8K 20 Jun 11:55 ..

-rw-------@  1 scott  staff   1.7K  7 Apr 15:12 mykey.pem

-rw-------@  1 scott  staff   610B 15 Jun 14:59 config
Note that I’m using the full path to the Directory, and I’ll use this full path when mounting this directory to the Docker container.
If you don’t have federation configured you can skip ahead to Running Peek Docker container
To find your IDCS URL
In the OCI Console, navigate to “Identity & Security” and click Federation, click your Federation Provider, as an example mine is called OracleIdentityCloudService.
Copy the Hostname (without the path) from the “Oracle Identity Cloud Service Console” URL displayed. As an example it looks like https://idcs-5dfhhd61c419aad5d31c8.identity.oraclecloud.com
Add this line to your text editor:
IDCS_URL = <Your IDCS URL>
To find your IDP ID
To obtain your IDP ID run the OCI-CLI command:
oci iam identity-provider list --protocol SAML2 --compartment-id <your tenancy OCID>
which will return a JSON response, in it is an “id” field. As an example it looks like ocid1.saml2idp.oc1..aaaaaaaaosb62razrasjddsjdsjjsdsbto655kdfvow5ipfb4i7yina
Add this line to your text file:
IDP_ID = <your IDP OCID>
Lastly add these values to your text file:
IDCS_CLIENT_ID = <Client ID from Step 11>

IDCS_SECRET = <Secret from Step 11>
Running Peek Docker container
Before we run the Docker container, you’ll need to ensure you have all the correct values in your text file. It should contain the following values:
APEX_USERNAME=API

APEX_PASSWORD=<Password from Step 16>

OCI_TENANCY_OCID=<Your Tenancy OCID>

OCI_IAM_URL=<Your IAM URL>

APEX_URL=<Your APEX Hostname>
#If you’re using IDCS
IDCS_CLIENT_ID=<Client ID from Step 11>
IDCS_SECRET=<Secret from Step 11>
IDCS_URL=<Your IDCS Hostname>
IDP_ID=<Your IDP OCID>
Pull the Docker container by running the command
docker pull scottfletcher/oci-peek:latest
Launch the Peek Docker container from the image with the command:
docker run -it --name peek

--mount type=bind,source=/Full/Path/To/.oci/,target=/root/.oci/,readonly

-e OCI_TENANCY_OCID=<from text file>

-e OCI_IAM_URL=<from text file>

-e APEX_URL=<from text file>

-e APEX_USERNAME=API

-e APEX_PASSWORD=<from text file>

-e IDCS_URL=<from text file>

-e IDP_ID=<from text file>

-e IDCS_CLIENT_ID=<from text file>

-e IDCS_SECRET=<from text file>

scottfletcher/oci-peek
Note: You’ll need to replace the /Full/Path/To/.oci/ value to your local directory as explained earlier. Also ensure there are no spaces between your key name, the equals sign, and the value as shown.
The Docker container will start and the information will populate to your APEX Instance. Populating Users & Groups takes approximately 5-10 minutes, after which time you’ll be able to see those results in your APEX application:
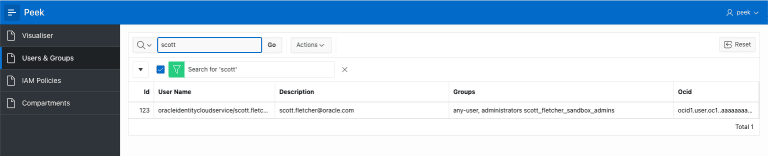
Viewing users in Peek APEX Application
Depending on the number of users, groups, compartments and policies in your tenancy the entire process may take an hour or so to complete.
After mapping the users and groups, compartments and policies the visualisation tree will begin populating. As each user’s permission tree is created, it is pushed to APEX via API and you can start your User Access Review.
When the process has completed, the Ruby script in the container will terminate and you’ll be able to see that in the Docker output in your terminal. You can then stop the Docker container.
To re-run the process, simply start another docker container. All previous results stored in the APEX database will be removed and new results populated.
For more information on how to view and interpret the data in Peek, I recommend watching the video at the beginning of this post.
Some Final Comments
- Use strong, randomly-generated passwords as described in this post. Also be conscious of where credentials are stored, and who has access to them.
- As a security practitioner, I would always recommend reviewing code before running it. The code for the script lives in /peek in the Docker container
- If you have any issues, would like some help interpreting the results please feel free to contact me at [email protected].
- Lastly, I’ll be updating the solution to work with IAM Identity Domains in the next release. If you’d like to use Peek before then, please let me know in the comments.
I hope you’ve found this post helpful and Peek a useful tool to help with your OCI User Access Review.